I build my projects right in the middle of our living room using hand tools. Since I use handtools instead of powertools, there’s hardly any dust, hence no need for a dedicated room or shop. I make the projects out of framing, that is, the infamous 2×4. When we moved in, I insisted that I would build all of our furniture—which I nearly did. The only exception being the table our landlord offered us for free and the couch we paid $200 for incl delivery(*).
(*) It was sold by a couple of entrepreneuring guys who sold couches out of a couple of storage units on craigslist picking up nice furniture from estates, etc. When they delivered the couch they informed us it was from Crate&Barrel but they wanted to honor the originally agreed upon price to which my incoherent mumble was something like “That’s nice” having never heard of Crate&Barrel. When they left, I looked it up. It’s a $1500 couch but it needed a new slip cover. Well, those cost $500 or more. ARGH! However, it turns out that slip covers are relatively easy to make, so DW made some out of old bed sheets. In any case, when we sell the couch again, the price will be somewhat higher.
Anyway, onto the furniture. This year, I’d posit that my woodworking skills have progressed to the intermediate level. I don’t follow plans. I make my own plans, typically after looking at pictures of furniture I want to build. This makes it possible to tailor the furniture specifically to the dimensions of our apartment.
First, here’s a bookshelf that I made. I think the design came out quite well in terms of relative proportioning. It’s also a knock-down design meaning it can be taken apart and reassembled for moving. It was made out of three 2x4s and two 2x8s for the shelves. All joints are done using hidden mortises. The whole unit has 20 of them. Eventually I became pretty good at making them without needing to readjust. Quite a pleasure when a joint fits the first time.

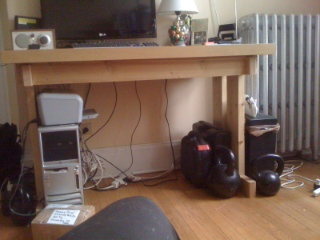
Next is the desk I made. It is also a knock-down design featuring 8 hidden mortises and 4 bridle joints. I don’t think the proportions came out as well, but at least it works. It’s made out of a couple of 2x4s and a 2×6. The desktop itself is a repurposed Ikea headboard from a bed. Much to my surprise, when I resized it (using my Disston D8 saw), I discovered that the headboard actually contained an egg-crate interior of cardboard to support the veneer. In hindsight, the furniture equation of light weight+nice looking wood+maximum profit margin = cardboard covered with a thin layer of veneer should have been obvious.
Also seen is the TV (I lost the battle this time. We didn’t have a TV in the RV, but we do now. This war is not finished yet 🙂 ), a Tivoli Audio Radio 1 (best table radio money can buy in my opinion), a free computer, and a bunch of free power tools we never use (I should have said no when they were offered to me).
Also known as the “yarn-tower”, I made this out of two discarded subfloor panels (free) and some scrap wood for the shelving. This was made with the help from family and friends (everybody likes to try to hand plane) over a period of about a week. DW painted it green. She’s still thinking about trying to paint it like a Tardis. I think you’ll agree: That’s a lot of yarn!
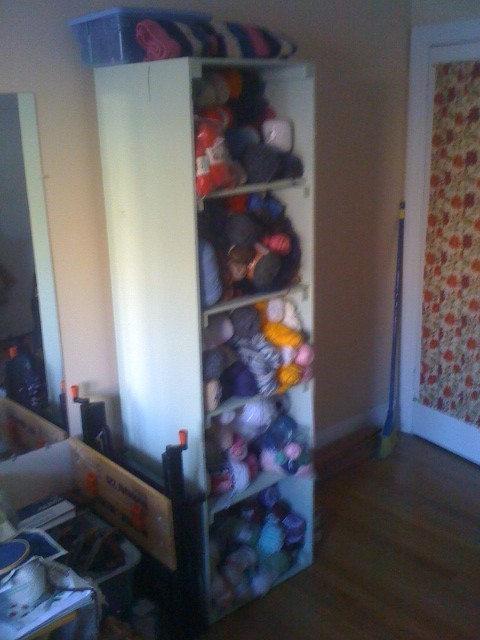
You can also see the workmate bench I still use. My two top priorities that never get done are building a proper bench and real tool box.
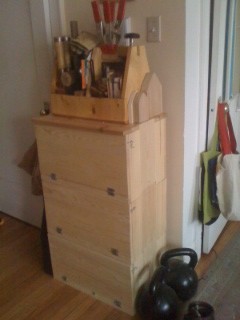
This final project is not my own design. It’s three stackable boxes which interlock and which can be opened on the side/front. The plan was intended for powertools. It’s usually not a good idea to use powertool plans for handtool work or vice versa, so I should just have taken the interlocking design (which is the brilliant part here) and recast the plans for handtools.
On top of the boxes is my first project ever, my tool tote. Also in the picture is some scrap wood I’m turning into a boat (with wheels) for my newborn niece. I might have to build a pole lathe to make the wheels first though 🙂 [In terms of web of goals, I suspect there’s a market in medieval furniture tools which makes it easy to get rid of + it’s cheap to make.]
Moderately related to the DIY above, I’ve been “perfecting” some domestic wine production. I’ve made apple, orange, tomato, potato, beet, wheat, and carrot wines. I’ve also made three kinds of mead (sweet, dry, and coffee). Overall I prefer this to store bought wine, both for the selection (more choice than just grapes) and because it appears fresher-tasting. Also, the cost is very low 😉 To make a gallon of wine, I use about two pounds of sugar, two pounds of vegetables or fruits (which can sometimes be eaten after use), 20 cents worth of yeast and a few tea spoons of chemicals (nutrients and acid blends) which cost $5-10 per pound (it takes a LONG time to use a pound!). I make it using 6 one gallon wine jugs (most stores sell these with cheap wine in them which one unfortunately has to drink first) as secondary fermentors.
Jennypenny has done a lot of work editing and fixing up the ERE wiki, which is intended to fill out the blanks between the philosophical/timeless practice of the book, my the personal journey on the blog, and everybody else’s on the forum, so check it out.