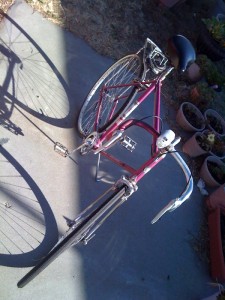
… is a modified 1968 Schwinn Continental. I got it on freecycle in a “broken” condition and it was more than the usual flat tire that needed fixing.
The drive train was state of the art during the first moon landing and while not much has changed in principle in terms of derailers, it did require a new set + cogs, so I decided to turn it into a single speed.
(Not to be confused with a fixie. Fixies require a special rearhub, because the freewheel would otherwise spin off when you brake leading to catastrophic failure—I don’t even want to think about it: Cog spinning into the frame, rear wheel falling off, pedals whipping around, cats and dogs living together, … mass hysteria! Now, you can either weld a freewheel onto the axle in which case it is called a suicide hub (see above) or you can buy one for $70 or so. This is why fixie bikes costs around $150-200 used. It’s mostly due to the new rear wheel.)
That said, I paid about $50 in parts to bring this one up to speed. And boy what a nice ride a steel bike is. “My other bike” is a alu-carbon hybrid racer. Aluminum (what most bikes seem to be made of these days) is very stiff. This means you get to feel everything the bike rides over. Consequentially, people have invented all sorts of gimmicks to reduce this vibration from specially shaped handlebars, special tape and computer designed bar end plugs. Hmmm …
A steel bike just glides over the road while the frame absorbs the road vibrations. The downside with steel is that it is heavy like a freight train. Whereas my $$$ alucarbon bike weighs around 19 pounds (pretty good for a 60cm) unloaded, I estimate the Schwinn weighs about 400 pounds. It takes some time to get rolling.
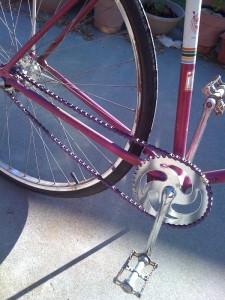
Anyway, here’s the new drive train (cost about ~$30, the other ~$20 are the new tires). Shiny, huh? (Click on the pictures to see a bigger/higher resolution version.)
I spent some time calculating the optimal gear ratio. Too low and you’ll be spinning at 12mph. Too high and you won’t be able to accelerate or get over the overpasses. The chain ring is 42 teeth and looks like a gaudy turbine. The rear is 15 or 16. This is pretty good ratio for relatively flat city riding. I have a few freewheels, so with a hammer and a pin drive punch, I can change gears in about 5 minutes 😀
(Incidentally, this bike has a one-piece bottom bracket which can be serviced with a wrench, a pin spanner, and $2’s worth of new bearings. Conversely, the bottom brackets of modern bikes have disposable cartridges with sealed bearings costing $30+ and require special tools. Devolution?)
One interesting thing about a single speed setup is that it is completely silent. It is also more effective in transferring energy from the pedals to the wheels. I enjoy the silence.
Now, the problem when taking off a wide cluster and replacing it with a single cog wheel is that the chain is not longer aligned with the chain ring. The cogs of both the chain ring and the freewheel need to be equidistant from the center of the frame! The rear axle, therefore, has to be respaced. The procedure involves a rear axle rebuild, inserting spacers when needed (this project was substantially delayed trying to get those spacers) so the cog is now aligned with the front chain ring. As you can see, it tracks pretty straight on. If it wasn’t the chain would be less efficient and the links would be slightly twisted. This is why multispeed bikes tend to make chain noise when you ride them.
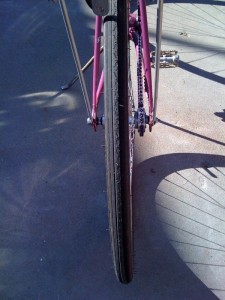
Of course respacing the axle means that the wheel is now in the wrong place. If you look at the front wheel of a bike dead on, you’ll notes that the spokes are even from both sides: the wheel is in the center of thehub. Now if you look at the rear wheel for a multispeed bike, you’ll notice that this is far from the case. One side looks almost flat. The other is deep.
What I had to do was loosen all the spokes on the flat side and tighten them on the deep side to move the wheel over. It does not look like it in the picture, but the wheel is actually centered in the frame now even as it is not completely center in the hub—one cog still takes up a little space. You’d normally do an advanced operation like this on a truing stand, but that’s a $100+ tool, so instead I consistently loosened by a quarter turn, tightened by a quarter turn, … repeating all the way around multiple times until the wheel had moved over. Then I touched it up and trued it using the sharpee method which is more like a $1 tool.
I still got a little bit of work to do including wrapping the handlebars and removing some of the remaining surface rust.
Overall, I’m pretty satisfied with the results. It’s not more than a year since I started learning fixing bikes by working on the bottom bracket of my old folding bike. At that time all I knew how to fix was a flat, so it’s definitely possible to learn a useful skill in about a year.
On another note, this shows that steel lasts at least half a lifetime. If you don’t want to learn to restore an old bike, you can always buy your way out of it. A few manufacturers are still making steel bikes. Here’s a list of bikes which are much nicer than mine. I can, however, park my bike unsupervised without much fear or maybe rather regret if it gets stolen. I’d hate to lose a $1500 vehicle though. This is also why I don’t use my alucarbon bike for errands.
Originally posted 2010-07-02 08:38:01.


